Many musicians believe that the oscillators and filters in a synthesizer are the most important for synthesizing sounds. But even more important for a musician is to be able to play these sounds expressively. Expression is created by adding modulations like note bends, volume and timbre accents, vibrato’s, etc. With a modular system all sorts of modulations can be created; manual modulations, automatic modulations at a relatively slow speed to ceate a sense of development or superfast modulations at audio rates that will produce changes in the timbre. Increasing and decreasing the modulation amounts gives those expressive effects to the sounds that are so unique to the modular synthesizer. Mixing becomes an issue when sound sources and/or modulation sources need to be mixed in some way. And except for the most simplistic cases mixing will always be needed. Which makes mixing actually the single most important issue on a modular synthesizer. This might seem a bold statement, but keep in mind that mixers are the glue that binds everything together. Just keep in mind that mixers let you blend the effects of the oscillators, filters, distortions, echo’s, reverbs, etc., into that one total sound you’re after. Look at it this way; when preparing food blending is what makes the difference between a magnetron meal and a haute cuisine dinner by a five star chef-cook. The final dinner will depend on the blending skills of the chef, and not only on the ingredients. Now, when e.g. a rompler synthesizer relates to a magnetron, a modular system relates to haute cuisine where all has to be blended. Keep in mind that on a modular system it is you who has to be the chef. Like any chef, earning your stars happens through building up your experience over the years. Using a single filter in the straightforward way may not give the filter sound you are after. But using two or more filters plus some modulations, distortions and effects, and then delicately blending their balances with some proper mixing techniques, might give exactly what you need. So, mixing on a modular system is really more than just tying things together, it is also blending different sonic aspects into the final sound. During the blending of sounds and modulations certain psychoacoustic issues are very important as well, as finally it is all about how the sound will be perceived by the ear and in the mind of the listener.
There are different approaches to mixing signals and at least two techniques are used with modular synthesizers. The first is the common type of mixing that is done on a mixing desk in a recording studio or during a live performance. In essence every single mixing channel is individually set to a certain range between silence and a level that is named the 0dB point. This point is nicely marked on the faders of a mixing desk. Audibly, the reference is ‘the mix’; each fader is used to set the presence in the mix of the instrument or track that lies under the fader. With this type of mixing the absolute volume level of each instrument is set individually, just until it has the right presence in the mix and the total output level does not exceed the headroom of the recording device used. For this type of absolute mixing faders with an exponential response curve work best. These faders can be easily recognized by their dB scale printed next to the fader knob.
On a modular synthesizer absolute mixing is also present, e.g. when setting the presence levels of various drum and percussion sounds in a percussion patch. But in between modules there is also another type of mixing with the distinct purpose to set a certain ratio between two or more signals. An example is when two different waveforms are mixed; resulting in a single new type of waveform that might have some desired new properties. Maybe these properties are only present when the ratio in amplitude is exactly 2 to 1. To set this type of ratio the amplitude relation between the two signals must be set to these exact values. This type of mixing is named relative mixing and is very common on synthesizers. Another common example of relative mixing is the dry/wet setting on an EFX box. For relative mixing the faders and knobs with a linear curve are the most useful, as they offer a more balanced range over exponential knobs to set exact ratio’s. E.g. when a ratio of two to three is needed, the first linear knob can simply be set to twothirdth's open and the other linear knob to fully open. This will give the two to three ratio. But when exponential faders would have to be used it is in fact quite difficult to find the right setting for this twothirdth's on the dB scale. As mentioned before, many mixer modules on the G2 have a button that can change the mixer knob curves instantly from exponential to linear behaviour and vice versa. The rule of thumb is that in between modules, while synthesizing the basic sound, linear curves often work best. While at the end of the patch or a ‘signal chain’, where the audio comes out and the final volume is set, exponential mixing works best. The exception to the rule is when only very small amounts of modulation need to be added, in this cases it is exponential knobs that actually work best, as they offer the finest resolution at the low end of the knob. E.g. when a little bit of an LFO signal needs to give just a little bit of vibrato on an oscillator the exponential knob is a necessity, as the pitch sweep of the vibrato is very small compared to the whole pitch input range of almost eleven octaves. The question to ask oneself is: ‘do I set the absolute presence of a single sound in the final mix’, or ‘do I set the exact relative mix between two or more intimately related things’. One way to solve this question up front is to ask if the mixing could basically also be done with a crossfader plus maybe some additional scaling after the crossfader. If so, then there is definitely a clear case of relative mixing, as a crossfader in fact sets the ratio between two signals. In practice the whole issue is easily solved, as with absolute mixing the exponential curve has a better feel and with relative mixing the linear curve feels better. On many mixer modules the type of knob curve, linear or exponential, can be quickly set with a button. Simply trying out these curves reveals pretty quickly which setting has the best feel, and so which curve needs to be chosen for the knob.
With relative mixing it is often the case that it is not two signals that simply need to be added, but that in fact one signal needs to be subtracted from the other signal. This is many times the case with control signals, but it also happens with audio signals. It might make a big difference in sound when a signal is added in antiphase to another signal. In this case subtracting instead of adding can do this. To provide for this possibility some mixer modules have an invert button next to their inputs. This button inverts the signal by changing it into an antiphase signal, before it is added to the output signal of the mixer. And adding an antiphase signal is equivalent to subtracting that signal from the other signal.
The G2 mixers have the unique feature that they can be chained. The main property of the chain input is that a signal that comes in on this input falls through the module unaltered to the output. Meaning that this input has always unity gain for the chain input signal. This is not only out of convenience to easily add en extra mixing channel when needed, there is in fact a very powerful mixing technique based on chain inputs, named add along mixing. In a modular synthesizer it is many times the case that there is some reference value defining some musical aspect and then one or more signals are added along to this reference value to create expressive modulations. This happens a lot when mixing control signals. Keep in mind that a control signal is always related to some musical property. An example is when the pitch of an oscillator is controlled. The reference value would probably be the keyboard note value. Added along to this keyboard note value can be a note transposition value from a sequencer. Added along to the transposed note value can be an envelope value that temporarily bends the transposed note on the attack of a key press or a new sequencer note. And added along to the transposed and bent notes there might be a little bit of a vibrato control signal. So, to the reference value that originates from the keyboard first a transposition signal and then two more modulation signals are added along to the reference value before the result is finally fed into the oscillator pitch input. A big advantage of this type of mixing is that it doesn’t matter at which point a modulation signal is added along in the chain, it will never influence the level of modulation of the other modulation signals.
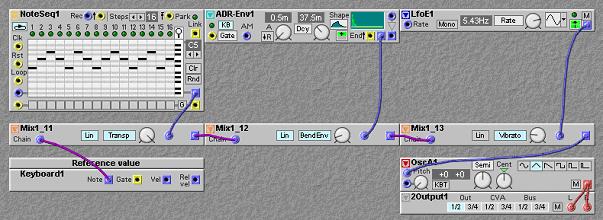
Figure 1 shows how this example can be patched with a couple of one-channel mixer modules. Each one-channel mixer chain input is connected to the output of the previous mixer. At the beginning of the chain is the reference value, in this case the note value from the keyboard. Keep in mind that this reference value falls unaltered through the whole chain. In the first one channel mixer the transpose signal from the sequencer is added along to the note value, then the note bend envelope signal is added along and finally the LFO vibrato signal.
Figure 1 - Example of add along mixing
The purple cables show how the original reference value falls through the chain without the possibility of being inadvertently attenuated by a mixer knob. The three modulation control signals are added along the purple cabling. The importance of this type of chaining on the G2 is that the buttons on the one-channel mixer modules can be named with a proper name, clearly referencing the musical feature it is related to. Pressing or depressing this button switches the feature on or off. If switched to on, the mixer knob sets the amount of modulation and if switched to off the modulation signal is instantly decoupled from the chain, stopping the modulation immediately. When the mixer knob is assigned to a G2 front panel knob the button is automatically assigned to the pushbutton under the front panel knob. The button caption text is shown in the display, together with the positional value of the mixer knob. The panel pushbutton can be conveniently used to toggle the musical feature on or off, with the pushbutton light indicating the on/off state. On the G2 this is the preferred way to interface the musical feature with the panel controls. The mixers that are specifically designed to be interfaced to the G2 panel knobs are the one channel mixer, the one-stereochannel mixer, the two-channel mixer, the four-channel mixer and the four-stereochannel mixer. When an odd number of channels is needed the mixers are simply chained, e.g. for five channels chaining a four channel and a one channel mixer will do the job.
There are cases when increasing the amount of some modulation signal, which gets added along in the chain, should also change the reference value. A very common example is when a filter is modulated by an envelope sweep. When the envelope signal is applied directly, the sweep is referenced against the cutoff setting of the filter. When the modulation amount for the sweep is increased, so the sweep gets deeper, it is musically preferable to automatically lower the cutoff frequency a bit. This has the effect that the sweep doesn’t appear to be on top of the cutoff frequency, but rather be more symmetrical around the cutoff frequency. To do this an extra layer of modulation is needed. Which means that the envelope modulation signal is itself also modulated before being added along in the chain of modulation mixers. The signal that modulates the envelope amplitude is a variable value that will be derived directly from a knob. In effect this knob will be used to set the depth of the envelope sweep. Additionally this variable value will also be used to lower the cutoff frequency. For this value to be able to lower the cutoff frequency when its value is increased, the variable value needs to be inverted before it is added to the chain. As the envelope signal itself will be modulated, it doesn’t need a mixer knob anymore. It is the amount of modulation signal that will control how much the envelope sweep is present in the final modulation signal for the filter.
Figure 2 shows an example of how this type of expressive envelope modulation can be patched. The module named Cutoff provides a value that is varied by the knob on the module. It is set to unipolar mode, meaning that turning the knob fully left will produce a value of zero units, while when turned fully right it produces a value of +64 units. The purple cables show that this signal falls through the chain unaltered and so will directly set the cutoff frequency for the filter. The maximum value of 64 units will shift the filter cutoff frequency by 64 half notes, so slightly over 5 octaves.
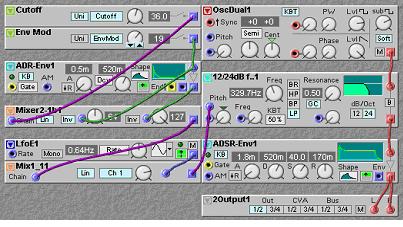
Figure 2 - Envelope sweep modulation example
The module named Env Mod also produces a value that depends on its knob setting. But this module is set to bipolar mode, meaning that it has a range of –64 to +64 units, while at the centre position of the knob the value will be zero. This value is fed into the input of an envelope generator module, which means that on the output of the envelope module there will be an enveloped control signal with it’s peak value exactly equal to the value set on the variable value module. So, turning the Env Mod knob will modulate the envelope manually between a negative envelope with a peak value of –64 units, though no envelope signal at all in the centre position, to a fully positive envelope signal with a peak value of +64 units at the right extreme of the knob. Then, a two input chainable mixer is used to combine the cutoff value on the chain input with the modulated envelope signal plus subtract a bit of the Env Mod value to lower the cutoff when the envelope amplitude is increased through the EnvMod knob. Musically the amount of envelope sweep can now steplessly be tweaked with one single knob between an upward sweep and a downward sweep. The downward sweep does not shut the filter completely off, as the sweep gets automatically centred around the cutoff setting.
The mixing chain can also be drawn in a schematic. Drawing schematics is never a bad idea, it gives insight from a different angle and allows to see the structure better than in the actual patch screen. There are no specific rules for the style of these schematics; one can use a personal style with personalized symbols. As long as the style is able to clarify matters any style will do.
Here are two possible schematic drawings of the two previous mixing examples. To simplify matters only the mixing chains are drawn.
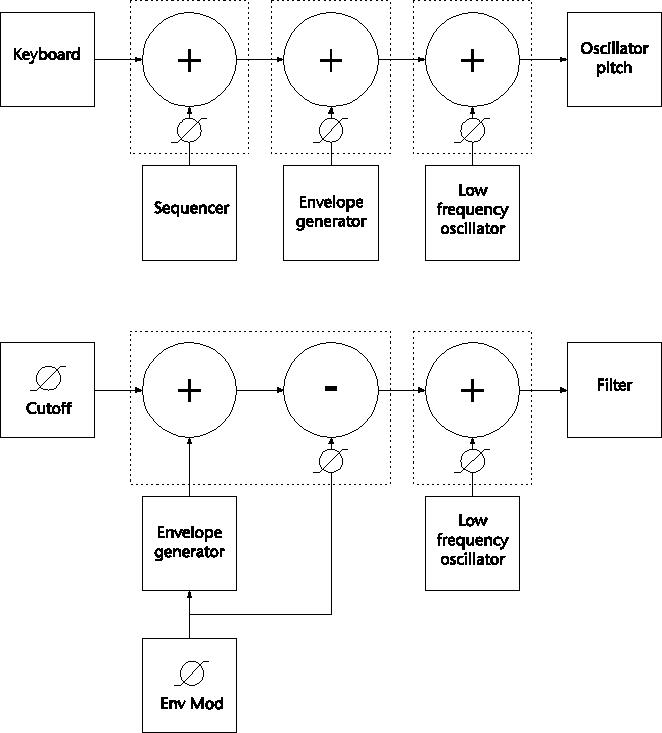
Figure 3 - Schematics of the mixing examples
The rectangles are symbols for a specific module and the circles are symbols for a specific operation, like add or subtracting. The dotted rectangles symbolize the actual mixer modules used in the G2 patch. The small circles with the diagonal lines symbolize panel knobs. The chain starts at the left module, which provides for the reference value, and proceeds from left to right along the fat horizontal arrows. The modules at the bottom generate control signals that flow upwards to be added along the mixer chain. There is now a clear control signal path for a specific parameter, the top example shows the path for the pitch parameter and the lower example shows the path for the timbre parameter.
In a synthesizer built according to the VCO->VCF->VCA model, like the traditional analog monosynths and polysynths, there can be three of these mixer chains for the musical parameters pitch, timbre and volume. Each chain would control either the VCO, the VCF or the VCA.
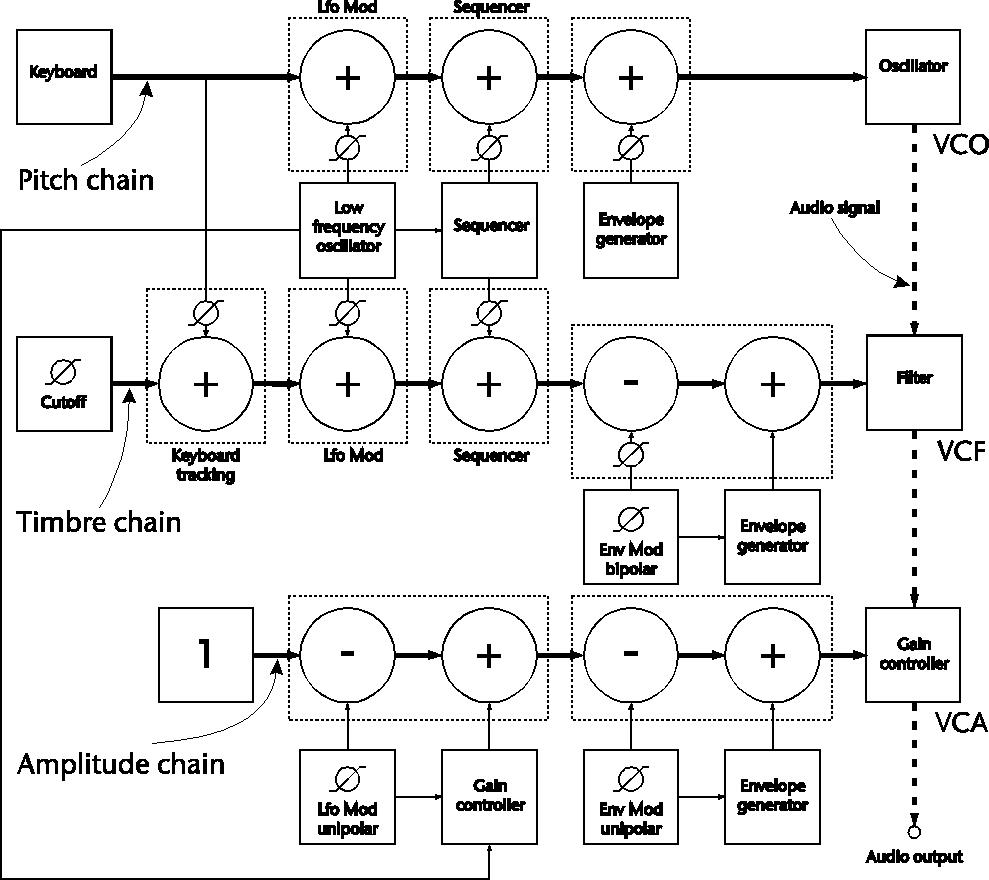
Figure 4 - Schematic of a VCO->VCF->VCA model
Figure 4 shows the schematic of how such a model could be patched. Note that the schematic does not say anything about oscillator waveforms or filter types, instead the sole purpose of this schematic is to show how expressive modulations can be applied to the musical parameters pitch, timbre and amplitude. The three fat horizontal arrows symbolize the three mixing chains. The pitch chain takes the keyboard note as its reference. Then, certain amounts of LFO modulation, a sequencer pattern and a frequency sweep envelope can be individually added along to the reference. The timbre chain takes the filter cutoff knob as its reference. When the cutoff reference value falls through the chain, certain amounts of keyboard tracking, LFO modulation, the sequencer pattern and a bipolar envelope sweep are added along.
Musically the model in Figure 4 is versatile and expressive. There is variable keyboard tracking for the filter. Note that, as the reference for the filter is the cutoff knob and not the keyboard note, causing the keyboard tracking to modulate around the cutoff frequency. The same goes for the sequencer signal, increasing the amount of sequencer modulation on the filter will also sweep around the cutoff. The type of mixing for the envelope modulation, which was explained earlier, will also cause the envelope sweep to appear around the cutoff frequency. In practice all modulations happen around a certain brightness level, which can be set with one dedicated knob. Changing a modulation amount will not drastically change the perceived overall brightness when playing the sound, as this is nicely compensated for with the mixing tricks. Which simply means that all modulations can be tweaked safely while playing.
The amplitude chain takes the value of the arithmetic number 1 as reference. This value equals +64 units and must be interpreted as unity gain. Meaning that when no modulations are applied in the amplitude chain the gain controller will have unity gain, very convenient as now the model will always give full volume when no modulation is applied. Then some LFO modulation can be applied to give a tremolo effect and next the envelope modulation can be applied. To give a proper envelope when playing polyphonic notes on the keyboard the modulation depth should here be set to 100%, of course. So, when no amplitude modulations are applied there is the full amplitude on the output. This allows for a drone beat that is modulated by the LFO and the sequencer pattern. When the envelope modulation amount is slowly opened the envelope will gradually increase in effect until the full envelope effect. The same happens to the LFO, meaning that in this model the amplitude modulation can be tweaked between a LFO tremolo and an envelope, taking a full amplitude as a reference and not silence. The sort of expressive effects that can be seamlessly tweaked with this sort of control signal mixing are commonly used in various old skool, drone and electro music styles. Figure 5 shows how the patch could look like in the G2 editor screen. Note that with the schematic at hand it is now much easier to follow the signal flow in the actual G2 patch.
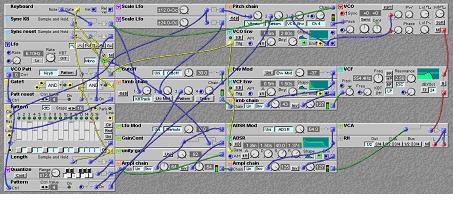
Figure 5 - The patch on the G2
Switch modules and mixer modules are closely related to each other. In fact, a multiple input mixer can be seen as a ‘superswitch’ where each input can not only be switched on and added to the output by fully opening its mixer knob, but the individual level can of course be set as well by tweaking the mixer knob. When a set of mixer modules are connected as an array they can together form a matrix with an attenuation knob and a mute button on each row/column matrix intersection point. This will create a ‘matrix mixer’, which is definitely the most flexible way to route signals between modules and set the levels of the signal paths. But the downside is that this will use a lot of computational resources. There can be redundancy in a matrix, which is basically a senseless connection. E.g. in many cases it is not very sensible to connect a module output to its own input, like when connecting the audio output of an envelope module to its own audio or trigger input. So, when patching a matrix mixer it is very important to analyse the matrix for possible reduntant crosspoint connections. he good thing is that these redundant crosspoints can be used for inserting extra signals in the matrix. This can save computational resources and reduce the size of the matrix. But it will also make the matrix slightly less easy to work with. Another approach is to use small submatrices that are connected to one small main matrix. In any case a lot of puzzling is almost unavoidable in setting up a matrix mixer. But after it is set up it will be a very fast and intuitive way of creating an enormous range of sounds, without having to repatch cables.
The examples in this chapter are to demonstrate that mixing is indeed a very important subject on a modular synthesizer, as it defines what sort of musical expression a patch allows. And while it is dead easy to connect the output of an oscillator to the input of a filter, some deep thinking might be required on how to mix several audio signals and modulation signals to provide for certain expressive musical effects. Experience is very important here, the more you experiment the easier it all gets. And luckily experimenting is a lot of fun. Just remember that the real art of sound design is in how things are mixed together and not really in what sort of a filter or oscillator is used. The secret of the experienced sound designer is that he blends the sonic aspects of the modules with the proper mixing techniques into that splendid sound, just like the five star chef does with the food. The good news for beginners is that corrections in a patch can always be made later; it cannot be permanently spoiled like a bad cook could spoil the food. Unless you forget to save and backup your patches, of course. Don’t be worried when on a first try you can’t get a sound exactly like you want it to sound, over time abilities will increase when experience grows and sounds will start sounding closer to what you have in mind.
Four different systems of mixing; absolute mixing, relative mixing, add along mixing and matrix mixing have been explained. The advice for now is to give these four types of mixing some very deep thought, until you feel you’ve got the hang of it.